
This post was originally published on Medium.
Windows vs. macOS: A Personal (Irreligious) In-Depth Review
What I prefer in Windows over Mac and vice versa.
I like the fact that 3 words allowed me to avoid a holy war and helped me retain more eyeballs on this lengthy guide.
Yes, this is what I'm talking about:
— "What I prefer in Windows over Mac and vice versa".
Clever right? Tehe.
I own four computers:
- 1 Windows desktop computer (a lovely 23kg gaming machine)
- 2 Windows laptops (a heavy ROG one and a Toshiba ultrabook)
- and a single (not married yet) 2015 13" MacBook Pro.
I own the latter since early 2018 and this was my very first Mac computer.
When it comes to the OS, I do enjoy both.
If I really had to tell which one I prefer, I'd say:
Mac: 45.8% | Windows: 54.2%.
Yah, I purposely chose close numbers to make a clever move, again.
It's been a bit more than a year that I'm using macOS.
I started with High Sierra and am now using Catalina (Mojave when I began writing this post). As for Windows, I started with Windows XP in 2004 and I now extensively use Windows 7 and 10.
I use both platforms to work and feel that I now experienced enough of them to share few discoveries I found to be useful.
Writing experience #
I'm a heavy writer.
As a programmer, blogger, essayist, typist, Skypist, Slackist, Messengerist, Mediumist and too-much-to-listist, I need to use the keyboard A LOT.
Really, a lot.
So without further ado, here's an in-depth explanation of how I use my keyboard to perform the majority of my writing tasks, be it programming-related or writing-related.
One last thing!
Unless said otherwise, the commands I mention in this guide are to be performed with a US QWERTY layout. If your configuration is different (UK QWERTY layout, Japanese QWERTY layout, etc), some parts of this guide may not accurately apply to your setup.
Now that it's clear, let's go!
Removing characters #
While coding or writing, I like being able to remove entire words that precede the cursor, as well as suppressing those that succeed it.
To be deadly clear about what I mean, here is what I'm talking about.
And here's the other case.
See?
I'm not removing words by chunking them one character at a time, but by slashing an entire word and the next one, and
the next next one, you got it.
Here is how I proceed on both platforms.
To perform the backward removal:
CTRL + REMOVE
For the forward one:
CTRL + DEL
— Really convenient.
On Mac, I remove preceding words this way:
ALT + DEL
For succeeding ones, I use:
FN + ALT + DEL
— Here, using 3 keys instead of 2 requires a bit more skill, but still, it stays pretty convenient on both platforms IMO.
Writing special characters - currencies #
This will deal with how to write four currency symbols: the Japanese Yen (¥), the Dollar ($), the Euro (€) and the British Pound (£).
The Chinese Yuan and the Japanese Yen share the same symbol for their currency.
On Windows, many characters must be written using the ALT + number combination.
Such a trick is successfully performed by holding the (left!) ALT key while typing, one after another, each digit of the number, then finally releasing ALT.
Big con: The composed number must be so with numbers of the numeric keypad! Using those located under the F1 to F11 keys row won't work.
It's a major drawback as many laptop computers do not have a separate numeric pad, so we may then be forced to use an
external one.
May be forced indeed, as, there's still one way to do it.
How about the hidden numeric keypad?
It is one that is accessible (on some laptops) starting from keys 7, 8 and 9 and that spreads diagonally to the bottom right.
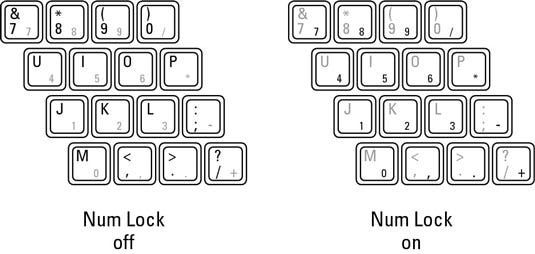
A numeric pad can be observed on the keyboard of Portégé laptop computers, the professional segment of Toshiba laptops. Digits appear in light grey on these.
However, this numeric pad does not work flawlessly on every laptop. And even for those on which it works, I find it to be quite painful to use.
Why do I think so?
Well, you do remember that to use it on a traditional keyboard we have to hold ALT while typing the digits?
Alright, now learn that to make it even more pleasurable, on a laptop we have to hold ALT + FN (in this order! as doing FN + ALT won't work!), type the digits and then release the two keys!
It is only after having successfully done this combination that the character we wanted to type will appear.
So yes, having a Windows laptop computer can be very irritating when it comes to writing characters that require using the "ALT + number" trick.
Okay, here is (finally) how we can write currency symbols on Windows.
¥ = ALT + 0165
$ = the $ key
£ = ALT + 156
€ = ALT + 0128.
Note: Some combinations have numbers including a leading 0. It's crucial to write it as, for example, typing 0165 will write a different character than 165.
¥ = OPTION + Y (easy)
$ = SHIFT + 4 (even easier as the sign is written on the key)
£ = OPTION + 3 (o_o)
€ = OPTION + SHIFT + 2 (O__O")
Writing special characters - useful symbols #
Be it for coding or writing, these are symbols that I consider to be useful:
- the hyphen - (found in "well-being" or for ranges like 07:00–11:00)
- the en dash – (for book pages range as in p10–12)
- the em dash —
- the underscore _
- left and right parenthesis ()
- the tilde ~
- the pipe |
- the backslash \
- backquotes
- single quotes ' '
- double quotes " ".
Let's now see how coherent one layout feels vs. another.
Yes, be careful, here I'm mainly focusing on the layout more than on the OS.
(Windows with an AZERTY layout)
Hyphen: The 6 key (without holding shift)
The en dash: ALT + 150
The em dash: ALT + 151
The underscore: the 8 key (without pressing shift)
Left and right parenthesis: respectively 5 and ˚(located after the 0)
Tilde: ALT GR + 2
Pipe: ALT GR + 6
Backslash: ALT GR + 8
Backquote: ALT GR + 7
Single quotes: the 4 key (without holding shift)
Double quotes: the 3 key (without holding shift)
Yes, you may have noticed that on an AZERTY keyboard, you have to press the SHIFT key to write numbers whereas on a QWERTY one you don't need to.
Also, many of the characters need to be written either by using ALT GR or the "ALT + number combination". Not to mention that 4 keys separate the left parenthesis from the right one.
Note: ALT GR is the rightmost ALT key.
It allows one to press a single key instead of having to press LEFT ALT + CTRL as it's the equivalent for this combination.
So yes, every ALT GR combinations can be replaced with a LEFT ALT + CTRL. For instance, ALT GR + 6 produces a pipe, so does LEFT ALT + CTRL + 6.
IMO, all of this makes it so-so convenient to write these special characters.
(Mac with a QWERTY layout)
Hyphen: There's a key for it to the direct right of the 0
The en dash: OPTION + hyphen
The em dash: OPTION + SHIFT + hyphen
The underscore: SHIFT + hyphen
Left and right parenthesis: SHIFT + 9 = ( and SHIFT + 0 = )
Tilde: SHIFT + </kbd> (next to the 1) Pipe: <kbd>SHIFT</kbd> + backslash Backslash: The \ key (on top of the "enter" one) Backquote: The key (on the left of the 1 one)
Single quotes: There's a key for it: on the left of "enter"
Double quotes: SHIFT + '
In this setting, I find it pretty straightforward to type special characters.
And that's the end of this "exception" part that was mainly focusing on keyboard layout differences rather than the OSs per se.
Writing special characters - utility symbols #
These are symbols such as:
- the degree symbol °, as in a 90° angle or 30 °C (celsius);
- the ring diacritic˚, appears on top of or below a letter (å, r̥) ;
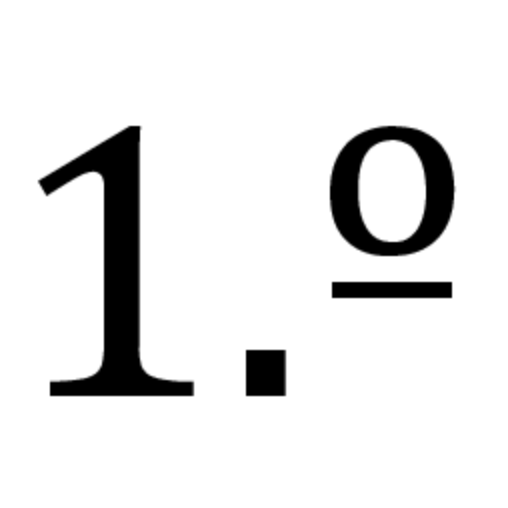
- the ordinal indicator º.
This last character is used in Italian when enumerating things, for example:
- primoº
- secondoº
- terzo º.
With certain fonts, it also has a stroke underneath.
(But not on Medium nor my blog).
Here is what it would look like with a "proper" font.
Pro tip: To identify the correct character for the temperature among these three, you can write a capital C next to it. The one whose center is not above the C and that is completely round (not elliptic) is the correct one.
So: °C (OK) ˚C (NOK) ºC (NOK).
By having them all side by side it's even easier to see that the first one is the correct one: °C ºC˚C.
Okay, let's finally learn how to write these characters.
I'll use the following order:
° = The temperature/degree symbol
˚ = The ring diacritic
º = The ordinal indicator.
To write these characters on Windows, I proceed as follows:
° = ALT + 0176
˚ = No idea as it's usually directly on top of/underneath a letter
º = ALT + 0186 (notice the leading zero).
° = OPTION + SHIFT + 8
˚ = OPTION + K
º = OPTION + 0.
To remember which character is the correct one for the temperature symbol, tell yourself that the hottest combination to perform is the one you're looking for!
Writing special characters - French letters #
In French, we have these letters: é, É, è, È, ê, Ê, à, À, î, Î, ü, ù, and … œ. Some are heavily used as they are super common in the language.
— Où sont les clés ?
— Where are the keys?
— Je vais à l'école.
— I'm going to school.
— Mon gâteau préféré c'est la forêt noire.
— My favorite cake is the black forest.
— Aïe ! Mon estomac me fait mal.
— Ouch! My stomach hurts.
So it's super important for me to be able to conveniently write them.
At first, I thought that this part was not relevant as I believed that writing with a QWERTY layout was the same on both platforms.
Hopefully, I was wrong.
I thus wish that what follows will bring anyone some insightful insights.
For my examples, I'll solely explain how to write é ê, ù and ï. Indeed, once we know how to write an "e" like this ë, we know how to write an "i" like this ï.
Windows + AZERTY layout #
The AZERTY keyboard layout is the one made for French speakers. Consequently, it should be the most commonly used by the vast majority of them.
In light of this, it makes sense that this layout should be the most convenient one to write French characters with right?
Well, since I own a Mac, I found that it's not really the case anymore. More on this in the last section.
For é: 2 (yes, there is a key for it).
For ê: ^ + e (pressing the ^ followed by an e makes an ê).
For ù: ù (there's a key for this character).
For ï: SHIFT + ¨ + i.
Update: If you want a thorough guide about accents used in French, take a look at this new one I made.
Windows + US QWERTY layout (NOT INTERNATIONAL) #
Here, we have to know the ALT codes, which is bothersome to execute on a laptop. And if the hidden numeric pad doesn't work, we are screwed.
For é: ALT + 0233.
For ê: ALT + 0234.
For ù: ALT + 0249.
For ï: ALT + 0239.
Writing in French in this configuration is definitely not an easy ride. Even though, it trains your memory 😆.
Mac + AZERTY layout #
I never had this layout as a personal computer.
I remember typing with this setup once ago on a computer that wasn't mine and it felt kinda the same as a Windows AZERTY
keyboard.
However, I did not use it extensively and have only a few memories about it so I'll update this article once I'll get my hands on such a configuration.
As I never owned a UK or any other type of QWERTY layout, I did not make any example with such keyboard configurations. The same applies for fancy AZERTY layouts. (Fancy = others than the French layout, such as the Belgian one.)
Mac + US QWERTY layout #
This is the mindblowing part.
At the extreme opposite of writing French with a QWERTY layout on Windows, writing with a QWERTY layout on Mac is, to me, such a breeze.
On a daily basis, I even solely use my MacBook Pro QWERTY keyboard to write about anything. This post, for example, was written using it.
Here is how I write French symbols using this keyboard/layout configuration.
For é: OPTION + e + e.
For ê: OPTION + i + e.
For ù: OPTION + ` + u.
For ï: OPTION + u + i.
For œ: OPTION + Q.
See? I find it to be soooo consistent!
To me, the combinations are not that far-fetched.
Once we memorized where the different accents are located, it becomes such a thrill to write accents using this keyboard layout.
Here are where they're located:
ˆ is on the i key.
¨ is on the u key.
´ is on the e key.
` is on its own key (right on the left of 1).
To type any of these accent, except the "`", we have to hold the OPTION key and then press the key of the desired accent.
Oh, and what about capital letters? For example this one: É.
It's simply OPTION + e + E (so SHIFT + e).
This is sooo convenient!
Even with a French keyboard, I meant an AZERTY one, we are forced to use the "ALT + number" trick to write capitalized accented letters.
Confession: Okay, capital letters with an accent are not that used in French for "some reasons" (a non handy keyboard layout? 😆). But still, having an easier time writing them on a QWERTY keyboard than on an AZERTY one, which is "the native" keyboard for French speakers, just blows my mind.
Reading experience #
I am a huge typography lover.
I can distinguish a 12pt Arial from a 12pt Helvetica being 30m away from the screen and even with it being turned off!
So yup, I treat fonts and things that may make them sexier as serious stuff.
Font rendering #
Besides being a huge font lover, I love writing and ... reading.
So of course font rendering plays an important role in how much I enjoy the reading & writing experiences on these OS.
It is said that font rendering is not handled the same on each of those. I thus wanted to verify this assumption by performing my own tests.
Here are my short and partial conclusions.
When it comes to reading code, I prefer the sharp angles of the Windows font rendering engine.
It may have to do with the fact that the monospace fonts (where each letter is equally spaced from others) used in code editors coupled with Windows fonts sharp angles may positively contribute to the easiness of reading code.
Indeed, even spaces conjugated with "seeing pixels" (sharp angles) may produce an overall impression of neatness in how the code is written, which may fool me into thinking that it is more readable (understand easily skimmable) on this OS.
On this platform, fonts seem to be less aliased.
This makes reading blog posts or any website content super comfortable. On the contrary, I find that for coding it softens texts a bit too much, which, IMO, decreases readability. Or more specifically, reading speed.
A word of caution #
I think it's much more complicated and nuanced than what I just said.
I meant, the reading experience.
For instance, in macOS's case, I simply wrote: "fonts seem to be less aliased".
That's cute.
But that's not the full story. If I was trying to be a little bit more explicit, I would have written that:
On a 13" MacBook Pro whose resolution is 2560*1600 and while reading a blog post on Google Chrome, fonts seem to be less aliased.
Indeed, accurately comparing different reading experiences that two different OSs offer takes way more thoughts into the process.
For example: Considering hardware parts.
Understanding the reading experience subtleties #
The reading experience is not solely influenced by the OS but also by hardware components with which we are viewing content.
As for Windows, I tried to reproduce as much as possible the environment I was in when I read the previously mentioned blog post on macOS.
To this effect, I used:
- the same browser (because yes different browsers may render fonts differently)
- the same browser zoom level
- the same viewing distance.
However, I used a 2560*1440 monitor whose diagonal is 27 inches.
It's a simple Dell U2713HM that is not labeled as "Retina", as opposed to the display I used while viewing the blog post with macOS.
So if I want to consider hardware in the equation, should I have used a Retina display to read the blog article on Windows?
Or is a screen comparable to a Retina one would close the gap enough to assume that both test setups are the same?
When digging on what makes a display eligible to be stamped as Retina, it's easy to understand that it should not specifically be made by Apple.
To grossly cut a long story short: it needs to have a PPI value of about 300. For those who want the longer story, I put links explaining what exactly is a Retina display at the very bottom of the resource section.
Also, there is this funny way of knowing if your display could be stamped as a Retina one.
Ok, I talked about hardware specifications (and how these can impact the reading experience) but software applications are also to be considered.
Types of it specifically. For example, on what type of applications do I find fonts to be less aliased?
Browsers? Code editors? Native OS windows (Finder/Explorer)?
What about how the software font rendering engine behaves in different apps? Inversely, are we sure that, for a given app, the font rendering engine is actually the same from an OS to another?
To me, these investigations deserve a dedicated post so if anyone is feeling like doing it, I'll be super pleased to read it.
Yep, even if it's a 40-min read 😄.
On reversing the initial setup #
I've conducted a quick complimentary test.
As a reminder, the original one was reading a blog post and some code on both my MacBook Pro (MBP) and my Windows computer. For this, I used my MBP's screen with macOS and my Windows machine connected to my external Dell monitor.
For this new test, I reversed them all.
I thus connected my MBP to my 2560*1440 27" monitor. What I witnessed is that this setup offers me exactly the same reading experience I had with Windows.
Doing this reversal test made plenty of sense to me as it's indeed the OS that I was interested in testing, not the hardware components that happen to be running them.
I was thus skeptical.
If macOS was rendering fonts "the same way" Windows did on my external monitor, then there would be no differences between these OS.
I needed to complete my reversal test, thus: using my MBP' screen as a monitor for my Windows machine. This way, I would be able to determine if I could have the same reading experience with Windows as the one I had with macOS?
However, as the HDMI port from my MBP is an output only, I didn't find a way to use it as an external monitor for any source I could give it.
If someone somehow managed to do this test, or more realistically, managed to use an iMac's screen with a Windows machine, I would be interested in this setup results.
From what I understand now, I became agnostic.
If I was asked the question: "Do you think that macOS and Windows render fonts differently?"
I would say: It could, as well as not, I'm not sure.
However, because people discuss solutions ( here , here , here , and there ) to have "the same font rendering on Windows than on macOS", I may not be too crazy (eyesightedly speaking) saying that I believe that both OS indeed have a different way to display fonts.
Basic interactions #
In this part, I'll solely focus on what each OS allows us to perform out-of-the-box.
So, even though big flaws could be fixed by the addition of apps, it won't be taken into consideration.
Let's start.
Duplicate a file from the UI #
Way 1 #
I first select (highlight) the file I want to copy, then display the contextual menu with a right-click and finally click on "Copy".
Next, I click on "Paste" and there it is: the file has been duplicated.
Way 2 #
I hold right-click on a file and drag it somewhere else then drop it by releasing the right-click. The contextual menu will open saying "Copy here". I select this option and I'm done.
Way 1 #
I first highlight the file I want to copy, then display the contextual menu with a right-click and click on "Copy Filename.txt".
I then right-click somewhere and select "Paste item".
Way 2 #
Right-click a file, the contextual menu will open, select "Duplicate". That's it.
— It seems slightly easier/quicker on Mac.
Duplicate a file using shortcuts #
I perform this using these combinations.
CTRL + C
CTRL + V
Here, I do it this way.
CMD + C
CMD + V
— Yey! Both OS are consistent!
Move a file using the UI #
Way 1 #
I first highlight the to-be-moved file, then click "Cut file" followed by a "Paste file" in the directory I want to move it to.
Way 2 (super convenient!) #
I hover the to-be-moved file with the cursor and hold right-click. I then move the cursor onto another folder and release the right-click.
Now a contextual menu opens in which I select the "Move file" item and I'm done.
Here, errrrrr, there's no way!
I kid.
But (being used to Windows?) it took me "YEARS" to find out how.
So here is how I proceed.
First, I right-click and select "Copy filename.txt".
(Yes, to MOVE a file we first need to COPY it! riiight?!)
Now, I right-click somewhere to display the contextual menu. Inside it will be displayed "Paste Item". Right now, I hold (my breath) the option key and witness the "Paste Item" item becoming "Move Item Here". I finally click on it and that's it!
I have successfully moved a file on macOS using s̵h̵o̵r̵t̵c̵u̵t̵s̵ the UI. 👏
Move a file using shortcuts #
That's where we can find some lil' funny differences.
On Windows, I first cut my file.
CTRL + X
I then paste it to move it and voilà!
CTRL + V
Here, I first copy my file.
CMD + C
Then I can move it using this combination.
CMD + OPTION + V
Rename a file #
Way 1 #
I highlight a file using the mouse cursor and left-click on the filename, it becomes editable.
Way 2 #
I highlight a file using the mouse cursor & press F2, the file becomes editable.
Way 1 #
I highlight a file using the mouse cursor and left-click on the filename, it becomes editable.
Way 2 #
I highlight a file using the mouse cursor then press Enter. The file becomes editable.
Note: In this sub-section, I purposefully didn't explain that on both OS we can rename a file by opening a contextual menu on the target file and selecting the "Rename file" item. This would have added a third way to both OS but it would have been exactly the same.
Rename files "one-by-one" #
Say we want to rename files from a folder in which there are 24 files of an anime named "Bleach".
Starting point:
We have files looking like "bleach_01_dl_from_anime_net.mp4", "bleach_02_dl_from_anime_net.mp4", etc.
What we want:
Files named "Bleach 01", "Bleach 02", "Bleach 03" and so on and so forth.
To perform the "bulk renaming", I start by copying the part "Bleach 0" such that all I will need to do is adding the proper digit after the "0".
The thing is: how do I quickly put the next file in edition mode?
And change its name then select the next to be renamed?
This is what I'm explaining here.
- Highlight a file
- Press F2 to put it in edition mode
- Set its new name
- Press TAB.
What happens after step four is that it selects the next file and instantly puts its in edition mode and updates made to the previously selected file's name are also saved.
On macOS, I did not found a combination of keys that allows bulk editing file names as quickly as the one I use on Windows.
On this platform, I resort to these steps:
- Highlight a file
- Press Enter to be able to edit its name
- Set its new name
- Press Enter to save the edits
- Use the right arrow to select the next file and
- Press Enter to be able to edit its name.
— A bit less convenient than on Windows here.
Lock the computer #
A simple WIN + L from whatever place on the OS and it's done!
For versions older than Mojave, the shortcut is: CTRL + SHIFT + POWER.
With Mojave, we now have to use CTRL + CMD + Q.
Same as on Windows, this shortcut works from any location.
I purposefully did not mention how to lock the OS using the UI.
Browse the filesystem #
This consists of selecting any file with arrow keys.
This only concerns the case where a folder displays its files as a grid, not as a list (as a list only allows us to move vertically).
On this platform, I find it super convenient!
I can browse any files using only the right and left arrows!
Wanna get to the last file of the folder?
Just hold the right arrow.
As a result, the OS will pass on every file in every row of the current folder and will stop when reaching the very last one.
Here, arrow keys do not enable us to browse every file of the current folder.
Indeed, if I hold the right arrow, the highlight process will simply stop on the rightmost file of the current row — and only on the current row, it won't step to the next one.
Because of this, I am forced to use the four arrow keys to perform every possible browsing move.
— Windows is the winner here.
Open the Explorer/Finder with a shortcut #
WIN + E
This shortcut works whether we are in an application or not.
CMD + N
However, we must be on the desktop for it to work.
To this day, I did not find a way to open the Finder with a shortcut without the requirement of being on the desktop or already in the Finder (or creating a new shortcut).
Enter a folder #
Okay, this one is super trivial, right?
Still, it took me some time to adapt from an OS to another.
Enter
CMD + arrow down
Using a single key beats using two IMO :p
Exit a folder #
Yes, it's simply the opposite of the previous command.
Backspace
CMD + arrow up
Hmm, I see consistency in both approaches, but still:
Using one key beats using two. Less is more.
Create a new folder #
I don't think this needs an explanation right? :]
Way 1 (using the UI) #
When in the Explorer, I perform a right-click and hover "New", then I click on "Folder". Here it is: the new folder has been created.
— A bit slow.
Way 2 (using a shortcut) #
In the Explorer, I hit CTRL + SHIFT + N and voilà!
Way 1 (using the UI) #
In the Finder, I perform a right-click and select "New Folder". That's it.
— Clean, convenient and quick.
Way 2 (using a shortcut) #
In the Finder, I hit CMD + SHIFT + N and voilà!
Here, both platforms are in sync: They share nearly the same shortcut!
— This is what we can call a teamwork win!
Create a new text document #
This guide wouldn't be complete without a part dealing with this super important feature: How to create a text file!
To be more specific, this part is about how to create an empty .txt file.
Here, I'll solely focus on the most straightforward way to perform the action.
In the Explorer, performing a right-click, hovering "New" and selecting the "Text Document" item allows me to do this.
Okay, here it's another story.
A totally different story.
A completely diff … you got it.
In the Finder, after performing a right-click, I noticed that there's no way to create a text document — nor a Word, nor an Excel. Solely an item allowing us to create a new folder.
The easiest way I found to create an empty text file on macOS is by:
- opening the Terminal
- entering
touch new_file.txt.
I'm just amazed as to how people need to be creative to fullfil this — IMO — basic need.
Check the size of a set of files #
This is when we select multiple files and want to check the size of these as a whole.
On Windows, I do so by highlighting the files for which I want to know the total size and right-click on any highlighted file. I then click on "Properties" and a single window shows up displaying the total size of the selected files.
It also indicates how many files have been selected.
Here, I find it to be … somewhat tricky, to say the least.
If I select multiple files, right-click on any of them then click on "Properties", at this very moment … the OS will open as many windows as the number of highlighted files.
Also, it won't display the size of the entire file set but, of course, the individual size of every selected file.
Internet browsing — opening a link in a new tab #
While browsing Google and having many links that interest me, here is what I do to open them all.
Way 1 #
I hover the desired link, hold CTRL and perform a left-click: The link opens in a new tab.
Way 2 #
I perform a right-click on the link I want to open and select "Open Link in New Tab".
Way 1 #
I hover the desired link, hold CMD and perform a left-click: The link opens in a new tab.
Way 2 #
I perform a right-click on the link I want to open and select "Open Link in New Tab". Yes, it works exactly the same way on both platforms.
Cross-platform neat trick: If we have a mouse with a mouse wheel, then clicking with it (performing a middle-click) while hovering the link we want to open will open it in a new tab, while keeping us on the current one.
Internet browsing — closing the current tab #
I do a CTRL + W and the tab I was currently on is now closed.
I do a CMD + W and it instantly closes the tab I was on.
Internet browsing — opening the last closed tab #
This! is a life-saving shortcut.
How many tears did I wipe from the face of some co-workers or friends? There's no number for this amount, there's no word for this joy.
In your turn, I hope it'll help you save someone too.
On Windows, I hit CTRL + SHIFT + T.
Here it is! The previously closed tab magically reopens.
On this platform, I use CMD + SHIFT + T.
Done! The last tab that was closed is now reopened.
Pro tip: We can spam this combination! At first, it will open the last closed tab. Pressing it once again will open the penultimate closed one, then once again would be the antepenultimate one. And we can go again and again and again.
Advanced interactions #
Here is the last part of this lengthy guide.
It's mainly for power users (software developers, or IT persons).
So I hope that those who belong to this category will have the opportunity to learn new things or find interesting bits of knowledge in any of these.
Remember: I am describing ONLY what would allow me to perform the interactions I want without having to install any additional program.
Yes, my desire to perform any task natively could be questioned. However, I think only allowing native features to be described also simplifies "the scope" of this guide.
Indeed, I'm reviewing the OS, not apps that could be installed on it. Although these could greatly improve one's productivity, I stick to out-of-the-box features.
Open the Terminal/Command Prompt #
I need to be able to open the Terminal/CMD quickly in order to have a good day. (Yes, it is as mandatory as having
breakfast.)
So how do I proceed to do so?
Here, I do as follows:
WIN + R then I type "cmd" into the dialog that appeared and hit Enter. The console (Command Prompt) is now opened.
As opposed to Windows, or even Linux, there is no default/native shortcut or combination of shortcuts that allow opening the Terminal.
Or at least, no shortcut that I am aware of as of High Sierra and Mojave.
Note: For this tip, I assume that Launchpad is accessible from the Dock.
Here is how I would proceed when needing to open the Terminal.
Hold the left-click on the Launchpad icon in the Dock until a list appears. In this list, hover "Other" then click on the "Terminal" item shown in this one.
I purposefully ditch the case where we have pinned the terminal to the Dock, making it accessible in a single click.
Open the Terminal/Command Prompt in the current folder #
I think that this is even more vital than the previous one.
Remember?
I said that I needed to be able to quickly open the console to have a good day. In fact, It was not totally accurate. Here is the whole truth: I need to be able to fastly open the console in the folder I am currently in.
This means, I want the console to be open at the path at which I am located. The previous command was simply opening it in the default folder.
Opening a terminal is cool, but if it can already be in the folder I want it to be in, then it's more than perfect.
This is how I proceed on both platforms.
(This is a Windows 10 tip only, not Windows 7)
While being in the Explorer AND inside the folder I want the Command Prompt (CMD) to be opened in, I perform the following commands.
- CTRL + L (to highlight the current path from the folder I'm inside of.)
- Wildly typing "cmd" (which removes the highlighted folder's path.)
- Hitting Enter.
BOOM! And voilà!!
This took less than 2 seconds and the CMD is opened in the desired folder.
Shift right-click on the current folder icon (So I need to be OUT of the folder I want my Terminal to be opened IN), click on New Terminal at Folder and boom.
Update: On macOS Catalina, there is now a "Services" item in the contextual menu that holds the "New Terminal at Folder" item.
But I need to use the mouse. So yep, it's slower than only being able to use keystrokes but eh! It does the job, and natively.
Copy the current folder path #
Here, we are in a folder and we want to quickly copy its full path to perform whatever it is we want to do with it.
In an opened Explorer window, I hit CTRL + L. This highlights the current folder path in the navigation bar. I then simply need to hit CTRL + C and the path of the current folder is copied into the clipboard!
Here, it's really straightforward. Perhaps not the most user-friendly, as it happens with no UI changes, but it really does the job.
In an opened Finder window, just hit:
CMD + OPTION + C
Once done, the current folder path is instantly copied to our clipboard!
Select (to copy it) an entire line from Terminal/CMD #
This is where while being in the Terminal/CMD, one wants to select what's displayed inside it and copy it.
(It's a Windows 10 tip only. It shouldn't work on Windows 7)
There, with an opened CMD, I use the left-click to select the text I'm interested in. I then press "Enter" and the selected text has been copied.
With an opened Terminal, I simply use the mouse and left-click on what I want to copy. Once the content is highlighted, I use CMD + C to copy it.
Paste a copied line to the Terminal/CMD #
On this platform, CTRL + V will paste what we have in the clipboard.
Here, a simple CMD + V will do the trick.
Access other drives from Terminal/Command Prompt #
This is when once in the console, we want to move to another drive than the one in which our console is running in.
On Windows, drives are assigned a letter. Most of the times, the main drive is named "C". Let's thus assume that we want to move from the "C" drive to the "D" one.
In such a case, I would do this:
d:
You saw it right, a simple "d" followed by a colon is all we need to switch to this other drive. Also, it is case insensitive: Typing a capital d or a lowercase one will yield the same result.
Plus, this could be done (understand works) whether the current console is at the root of the filesystem or not.
On macOS, things are a bit different.
Every drive is accessible at the following path /Volumes/.
So to access any drive, we simply need to know its name. With that in mind, doing ls -la /Volumes will allow us to
discover the name of every existing volumes.
From there, we can then simply do:
cd /Volumes/Drive_name
Where "Drive_name" would be the name of one of the drives returned by the ls command.
Uninstall software programs #
We won't be considering the uninstaller some executables are shipped with.
On Windows, its always the same process. Whatever we want to uninstall, we simply have to go to:
Start -> Settings -> System -> Apps and features.
The list of currently installed software applications will be displayed and we'll be able to choose among this list the one app we want to remove.
On macOS, there are two ways.
Way 1 #
Open the Launchpad, stare at the app you want to uninstall and hold the left-click on it. The icon of all apps will start oscillating and, if you are lucky, a cross will appear on the top left-hand corner of your targeted app.
If there's none, then you'll be forced to use the second way to proceed with the uninstall.
Way 2 #
Go to the "Applications" folder. You'll see nearly every application you've ever installed and all files in this folder should end with a ".app" extension.
To remove any given program, simply delete the corresponding ".app" file and it will be uninstalled.
Move files from a filesystem to another #
I'm referring to the case of external hard disks, USB drives, and other peripherals.
There's no particular issue there. I never encountered any problem moving files from a Windows operating system to as exFAT, FAT32, NTFS.
We cannot move files on an NTFS drive. Unless being willing to go over a painful configuration of a third-party software app, we won't be able to do it out-of-the-box.
I'm aware it's not really an operating system "problem" and it boils down to the fact that external hard drives are often formatted using NTFS or FAT32 and that it happens that NTFS is a proprietary Windows filesystem.
Show hidden files #
Open an Explorer window and click on Select, View and “ Change folder and search options”. Then, in the View tab, select “Advanced settings” and tick “Show hidden files, folders, and drives”.
Confirm your modifications by pressing “OK”. Now every folder of the entire system will display hidden files.
CMD + SHIFT + . (yes, the last key is dot).
Super simple.
Adding a system language and switching to any installed one #
Here, it’s about adding a new language to the OS and being able to switch from one to another (which requires a reboot).
I won’t explain how to add a new language as it’s pretty straightforward.
I’ll just compare which OS allows me to add a language without screwing up itself — having it half-translated making it feels like it’s broken or unstable.
The scary part here is that when rebooting the system (any time, not only right after having installed a new system language), we can still have remainders of the previously selected system language.
Which I indeed find scary.
What if critical files were affected in the process?
Hard to tell.
Works flawlessly.
No half-translated menus nor nothing.
It just works ... flawlessly.
Switching the keyboard language #
Remember that I write in either French, English or Japanese?
Good.
So yes, being able to switch the language I’m using is sort of vital for me.
We just need one key combination: ALT + SHIFT.
However, for the Japanese keyboard, it switches to a kind of non-native app. Thus, if I want to switch from hiragana to katakana or romaji (three different modes of the Japanese keyboard), I have to use CTRL + MAJ to perform the trick.
Holding CMD + SPACE displays the list of available languages. While still holding the CMD key, pressing SPACE allows selecting the next available language in the list.
Once satisfied with the selected language, releasing CMD instantly applies the last selected language.
Download files while being AFK #
I’ll take the case where I download a file using Google Chrome and leave my computer for 20 to 240 minutes. Oh, I meant four hours.
Here I can start a download, leave the computer and even though the OS goes into sleep/hibernate mode it’s fine, the download won’t stop.
I can even disable OS hibernation or sleep mode in the OS settings and it works as expected.
On Mac, it’s another story.
Totally.
Even though I disabled the OS hibernation and the sleep mode, if I start a download and leave the computer as it is, the screen will turn black and ultimately ... the download will stop.
*Shocked*
Indeed, MacOS turns off the wi-fi when entering sleep mode and I didn’t find a way to have the behavior I wanted — without using third-party programs.
Yes, there are utilities such as caffeinate that prevent the Mac from going to sleep but, to be honest, I think there should be a native feature for such a trivial task.
Still, I found a way that I consider to be native. Here is how I proceed:
When I start a download and want to prevent my Mac from sleeping, I open this Youtube video in a browser and set my brightness to 0.
Keeping the focus on the opened tab with the video playing will prevent my Mac from going to sleep — even though the brightness is set to 0 as it is not considered as being sleeping.
So here is my trick! If someone has a better one, I’m a buyer!
Window management - halving a window #
By halving, I mean resizing an app window so it takes half of the screen.
Way 1 (using the UI) #
By dragging a window to the right or the left of the screen, Windows automatically resizes it once hitting the screen's edge.
Clean, convenient, quick.
Way 2 (using a shortcut) #
WIN + Left arrow allows halving the current window to the left of the screen. This is NICE and convenient IMO.
Way 1 (using the UI) #
By holding the green button (in the top left corner) of a given window, macOS enters The Split View mode and allows us to half a window by drag it on either the left or right part of the screen.
As opposed to Windows, we are not forced to hit the edge of the screen. However, we must first enter the mode that allows splitting the windows.
Update: Since macOS 10.15 (Catalina), the green button's behavior slightly changed. Holding it shows a three items menu asking us whether we want to half the window on the left, on the right, or if we simply want to fullscreen it.
Way 2 (using a shortcut) #
Apparently, we need to install an additional software app to be able to use shortcuts for such a task.
*Speechless*
The app Spectacle seems to be what is recommended for the matter.
Window management - show the Desktop #
This is when we are deep inside a messy mess of windows and just want to instantly access your desktop.
On this platform, I simply hit WINDOWS + D and every single opened window get minimized to the taskbar. The Desktop then becomes fully accessible.
Here, I know two ways to do it.
Way 1 #
I hit CMD + F3 and the desktop shows up instantly.
Way 2 #
I hit FN + F11 and the desktop also shows up instantly.
Window management - switch to the next program #
This is when we switch from a program to another, browsing every opened program.
For this, I use the infamous ALT + TAB.
This allows browsing any opened program, whether its windows have been minimized or not!
ALT + TAB works too and this is what I use the most. However, there is a slightly different mechanism as to how it works on this platform.
Indeed, if we minimize a window, then using ALT + TAB will not switch to the minimized window. Even more annoying, it will show us that it is focusing the minimized program, but just won’t open it! The window will stay minimized even though it has the focus.
Hooow awesome! 🙄
Close a program #
To close a program, we can either:
- use the X at the top right-hand corner or
- press ALT + F4.
Both of these techniques will lead to the same result: instantly close the current program/window.
Mac: Wonderful World of subtleties.
Here, we can either use the cross (located at the top left-hand corner this time) or perform the following key combination CMD + Q.
However, these two ways of closing a program may lead to different results depending on which software we are closing.
On Visual Studio Code , if we click the X button on the UI and then reopen the software, everything is empty. It won’t show us the last project we worked on and thus you’ll have to reopen it by browsing the file system.
On the contrary, if we use the CMD + Q combination, then everything is fine: Visual Studio Code will be closed and reopening it will prompt us on our last opened project.
Tip: We can make MacOS behave the same as Windows by using RedQuits . This thread explains how to setup the software. Once installed, pressing the close button on the UI will actually quit the application.
The drawback of this solution is that if we have multiple Finder windows opened and that we close one of them, every windows will be closed.
And that’s it! This section about closing windows is the closing part of this review!
👏 👏 👏 👏 👏 👏
Thank you for reading! #
I hope you learnt something new and useful along the way. Please, if you find something to be wrong or inaccurate in this guide, feel free to reach me out on Twitter!
Also, if you see any improvement or know anything that I did not cite there and that could enhance this guide, please feel free to ping me.
Below is a part explaining why I’m confident in the fact that mistakes could have been done in it! 😄
If you simply already are fulfilled by what you read, have a nice day!
Else, brace your brain!
This is an off-topic part where I explain a few difficulties that showed up while I wrote this guide and that may have lead to subtle mistakes or inaccuracies.
The trickiness of the keyboard part of this post #
I am now used to write on my MacBook’s US QWERTY keyboard layout. But prior to that, I always used Windows with an AZERTY layout.
So what made it super challenging was that my brain was (and still is?) hardwired to think that Windows = AZERTY and Mac = QWERTY, which is in fact wrong and may lead to subtle mistakes!
For example, this yielded in me starting to explain that on Windows, the “SHIFT + $” combination produces a £ when it’s only this same combination but with an AZERTY layout on Windows that actually leads to produce a £!
So once again, please, inform me of any major inaccuracy that could have slipped into this guide.
Thanks to this article, my brain is also finally understanding that “combination” is spelled combination and not combinaison as the latter is the French word for it.
OS + keyboard layout + keyboard pad + keyboard layout configuration = 🤕 #
OS is Mac or Windows.
Keyboard layout is AZERTY or QWERTY.
Keyboard pad is one with or without a numeric pad.
Keyboard layout configuration is US layout or UK layout, etc.
Another challenging thing is keeping up with the different possible configurations for a single layout!
You could be using a QWERTY layout on a Mac computer, well that’s great! But is it a US QWERTY layout? a UK one? Another one?
Is it with or without a numeric pad?
Without?
Are you sure? It could be hidden as for Toshiba's Portégé laptops.
Mixing all of these makes it harder to have a straightforward explanation because you have to explicitly indicate which configuration you are using and how a different configuration could yield to the same results.
And I know I did not bother with being that explicit every time as it would add verbosity to the guide and that this would only be helpful (to be that explicit) to a handful amount of people.
Resources #
Here are a few resources that helped me redacting this post and that sometimes helped me "fact checking" (more like fool proofing) some parts.
Keyboard section #
OS X Daily - How to Type Degree Temperature Symbol in Mac OS X .
How to type the Euro symbol on Windows .
The Hidden Numeric Keypad on Your Laptop .
To be sure about diacritic and other roundy thingys, here .
Font rendering section #
How to get Apple font rendering on Windows?
Windows 10 vs. macOS Font Rendering. Why, Windows?
Retina display explanations #
Apple Retina Display Patent Comes to Light .
The intuitive way to know when your display becomes a Retina one: here .
And the best for last … #
How to Create a Text File in a Folder on macOS .
Still there? You’re a real curious. That’s good.
To reward your good trait, here is a last bit of knowledge:
This post — that you read entirely — was
mainly written in my Gmail inbox
.
Woh, still there?!
I am looking for someone that uses (writes) superscript numbers a lot:
Can you help me?
Did you find this article useful? Thank me with a matcha! 🍵
↑